Tuesday, November 21, 2006
Jakarta - Shopping Heaven
It was a really short trip but worth every penny or should I say worth every Rupiah. Jakarta reported to had a visit by George Bush and university students having several picket sessions. But when I arrived, everything seems calm and the road is busy, I mean really really busy. Twice as much busier than Kuala Lumpur.
I manage to check in to Santika Hotel located in Pertaburan road. A little shock at the counter as there is no reservation under my name. The rate is far expensive than I planned earlier (around USD81 per night rather than USD49) but time is running out, I just pay the deposit, RP 1600000. I tried to call my boss, darn I just couldn't get through the roaming network. I thought Hotlink should to guide me better.
The next task is to find the meeting place somewhere in Palmerah road stretch. I decided to take a taxi just by the hotel lobby. "This is easy" I said but the driver seems had no idea of the place and later on he simply drop me in the middle of no where. Crap... with no map and no exact address, I wander of by the street and off to some large market.
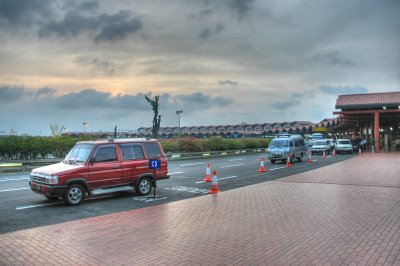
I walked until I find the main entrance of the office and I thought I was finally there. But it was not. The guard help me stop a taxi (there call it mini bus or something), a Toyota Unser with no. 9 on the windscreen and ask me the driver to send me to the exact place. And again I thought I would be there in no time. I'm wrong again, when the last passenger get down and I'm the only one left I ask the driver, "are we there yet ?" the driver was shocked and he is completely forgotten to drop me. He quickly apologize and send me to the exact place.
By the time I arrived at the meeting place, my boss called and ask me to get back to the hotel as there is no one at the office by this hour. Crap, all this sweat is out for nothing. But at least I already know the place. This whole mess is just because I can't use the Hotlink's roaming facility. The next day onwards, I simply direct the taxi driver to the exact place.
With 3 days 2 nights trip in a foreign country what would you do? The best I could imagine is shopping. That is exactly what I do, I ask the bell boy where is the best place for souvernier, textile, electronic and so on, he gave this list
1. Sarinah Plaza (Souvernier stuff)
2. Semanggi Plaza (Famous local mall)
3. Sogo (Only the elits goes there)
4. Mangga Dua (Get your DVD here for only RP6000)
5. Majestik (Famous textile street - Like Jalan TAR in Kuala Lumpur)
6. Roxy Mall (The whole mall selling cellphone - nuts)
One thing about Jakarta (currently) every vehicle entering mall or hotel must go through the security post equipped with bomb/explosive detector. What do you think, feel scared or secured?
Generally Jakarta still a save place to travel especially for shoppers and the people here had a great hospitality attitude.
Wednesday, November 08, 2006
DIY - How to build a humidity free container
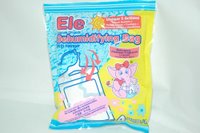
 I was searching for a special container for my camera kits and I realized that I can make my own with far cheaper. All you have to do is go to the nearest hypermarket and get this item.
What you need is a container box (mine Toyogo brand – RM9) and a bag of dehumidifying bag (Ele brand, 4 bags – RM3). Put a bag of dehumidifying stuff in your container and it will last 3 month or more. You can choose to have a tight seal container from top brand like Tupperwear or dehumidifying brand like Thirsty Hyppo it’s your choice.
So now you don’t have to worry about those annoying fungus.

Preventing fungus from developing on your camera
 Unless you are living in the hot and dry area, you shouldn’t be worrying about fungus. But if you live in high humidity places like Malaysia, the chances of fungus developing in your camera body or even inside your precious lens are pretty high.
Once it’s in there, nothing much you can do. It’s either you send it for a cleaning service at the professional service centre or of course you can do it yourself. I’m not sure how much it will cost you if you want to get the professional service, but you don’t have to worry much on the result.
If you find the fungus just started to develop on the external camera body, like mine, you can treat it yourself by using vinegar. Dip a hard cotton swab with the vinegar, and rub it gently on the effected area. Acidity in the vinegar is very mild so it is quite save to use it as the removing agent.
As for the lens, you can spot the fungus at the connector ring inside the lens. If you want to do it yourself, get a watch screw driver and remove the glass from the housing tube one by one. Cross your finger and hope you can remember each glass position.
Wiseman always said “preventing is better than searching a cure”. To stop fungus, store your camera in a humidity free container. You can get it from your special camera store or even on the internet. But do you know that you can make yourself a decent humidity free container? Coming up next, “How to build a humidity free container”.
Getting more than what you want
 While surveying for the Nikon D50 last week, non of the camera store that I visited has a stock. The D50 must be extinct, I said to my wife. At that moment my selection is down to Nikon D70/s or the new D80 which is far over my budget. What should I do.
As we walk through all the camera store in Sg Wang and BB plaza, we end up to a store, the last store of the day, and we ask for the D50. Of course there is no stock but then we saw the D70s kit box with the price tag RM3999. So we start to walk away, but stopped by the taukey, (I classify this type of store as the Otai store, due to the age of the owner - must be grandpa age).
"Are you a student", I'll give a special price for a student. My wife node and she bargain the price down tu RM3200. And the rest is history.
What we can learn from all this?
- If you plan to buy anything in Sg Wang area, you must bargain at least from 50% lesser from the display price.
- I just found a new camera store at pudu plaza. Sound very famous.
- Sometime things can turn out not as planned.
Black and White: Camera setting or Post processing
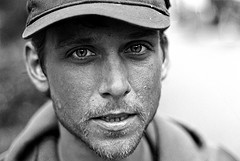
 Stoneth, one of my flickr's contact has excellent black & white (B&W) photo set that I admire. I did wondered how he does that, as no exif data available in all his B&W photo. So I thought it must be post processing.
So I look for the best way to produce a B&W photo on the internet. Through all my reading, there is no exact answer for this but basically there are two ways to achieve this.
- Camera setting. For the digital camera, usually there is a menu to take black and white photo.
- Post Processing. There is lots of softwares that can easily turn your photo into black and white. But my favorites are Google's Picasa and Photoshop.
- Texture
- Structure and angles
- Symmetry and Relationships
- Mood
Some would say that colour causes confusion and that black and white reduces the image to its components. I believe that black and white images are simply different; they show the subject with a different perception.
So let's continue with post processing method.For Google's Picasa, which is currently version 2.0, has one click button to produce black & white photo. Really simple and straight forward.
But for Adobe Photoshop, there are so many ways to produce black & white and I'll cover two methods first for a start.
Channel Mixer Method
The more popular way to convert a photo into black and white is using the Channel Mixer.
- First, open your photo and then add a Channel Mixer adjustment layer.
- Select Monochrome and adjust the percentages for RGB. Again, I usually start with 70%, 30%, 5%.
- Adjust the percentages until the photo looks good, don’t worry about great, we’ll get to that in a moment. You can also adjust the constant percentage to lighten or darken the photo. In this case I darkened the photo by setting the constant to -2%.
When done, click Ok - Now, duplicate that layer twice. If you flatten the photo, just drag the layer to the Create a New Layer Icon on the Layers window. If you prefer to not flatten, you’ll need to duplicate both the above layers. The easiest way to do this is by selecting both the adjustment layer and the photo and dragging them to the Create a New Layer Icon on the Layers window.
Click on the one of the duplicated photo layers. - Change the Screen Mode to Color Burn and reduce the opacity to something between 5% and 15% (personal preference).
- Click on the other duplicated layer
- Change the Screen Mode to Soft Light and reduce the opacity to something between 5% and 30% (personal preference).
- Now the Photo should have more depth and not look as flat. You can adjust each of these layers based on the photo of your personal taste.
- One thing I find useful is at the end to add a contrast layer, this will darken the darks and lighten the white. This is optional step.
Lab Color Method
It is a simple process, but does require the use of a robust post-processing application, such as Photoshop CS.
- Open the file you want to convert.
- Convert to Lab Color by going to Image>Mode>Lab Color
- From the channel window (if it is not open, go to Windows>Channels) and select the Lightness Channel. Select all by either going to the menu Edit>Select All or Ctrl-A or Cmd-A and copy the selection either through the menu or Ctrl-C or Cmd-C. Then convert back to RGB Mode, go to the menu Mode>RGB.
- Go back to the Channel Window and select the Red channel. Paste either through the menu or Ctrl-V or Cmd-V.
- Select the Green Channel and paste either through the menu or Ctrl-V or Cmd-V.
- Select the Blue Channel and paste either through the menu or Ctrl-V or Cmd-V.
- Reselect the top channel to make all the color channels visible again and you are done.
Travel Photography
I keep asking myself how to prepare myself when I need to travel overseas and interstate. I need to be well prepared as the opportunity might be limited. So I research a bit and here are the check list that I put together, for now.
Basic knowledge of the place you are visiting
Get yourself a map. It might be your best companion. Or perhaps you might want to get a local tour guide. Get to know the place a little bit so that you won't miss any special event. Today there is lots of tourism websites in the internet that offer you at least a basic information about the place that you're visiting.
What to Take in your Kit?
Packing for a trip is a camera bag is a very personal thing and each traveler will have their own preferences as they attempt to balance weight issues with functionality but here are the basic list that you can start with:
What to shoot ?
It's sound silly but I always don't know what to shoot when I was on the place and I always regret not to take some shots that you missed. So the question is what type of photo that I should consider while I'm traveling? It is quite simple actually, you just imagine what kind of photo you want to fill in your travel photo album and ask yourself:
Basic knowledge of the place you are visiting
Get yourself a map. It might be your best companion. Or perhaps you might want to get a local tour guide. Get to know the place a little bit so that you won't miss any special event. Today there is lots of tourism websites in the internet that offer you at least a basic information about the place that you're visiting.
What to Take in your Kit?
Packing for a trip is a camera bag is a very personal thing and each traveler will have their own preferences as they attempt to balance weight issues with functionality but here are the basic list that you can start with:
- Extra Batteries
- Recharger
- Power Adapter
- Cleaning Gear
- Filters
- Flash
- Memory Cards
- Camera Bag
- Tripod
- Point and Shoot
What to shoot ?
It's sound silly but I always don't know what to shoot when I was on the place and I always regret not to take some shots that you missed. So the question is what type of photo that I should consider while I'm traveling? It is quite simple actually, you just imagine what kind of photo you want to fill in your travel photo album and ask yourself:
- Who did you travel with?
- Where did you stay?
- What did you eat?
- Who did you meet? etc
- Buildings
- Landscapes
- Local People (at work and play)
- Travel Companions
- Food and Drink
- Hotels
- Transportation
- Market places/Shops
- Street Scenes
- Local Written Language/Street signs
- Shots of yourself (alone and with others)
So just use my imaginations. But often I read that the true joy of traveling is not how you record your trip with your camera, video, etc, but it is how you experience the moment of 'being there'. And I think it's true, sometimes the drive to ‘capture’ every moment can become a distraction from the true joy of travel.
Welcome to Transition
I'm transforming this blog completely into my travel & photography blog. I'm gonna set another blog to satisfy my interest on the web technology. Okay I already did that. It's called Azo Web Sphere. Which is should be more frequent update.
The Blue Planet Explorer was meant for traveling blog and it is a good idea to have a speacialze blog rather than putting everything in it. It's proven. The Grand Auto Club, well it's the other blog I have, maintaining PageRank 5 compared to this blog which is only gaining 3 PageRank.
Whoop it's late. Cheers
Subscribe to:
Comments (Atom)


